Benz OBD2 Odometer Correction Tool is a good helper to adjust your
Benz OBD2 odometer. This user manual will show you the basic info and
operating practices about Benz Odometer Correction Tool.
The features of Benz OBD2 Odometer Correction Tool
* If operating through the OBD2 interface, no wiring required.
* If the operation is perform ed by wiring, No filter required.
* Supporting 2015-2017 new Mercedes-Benz.
* No filter; Not change meter; Security;
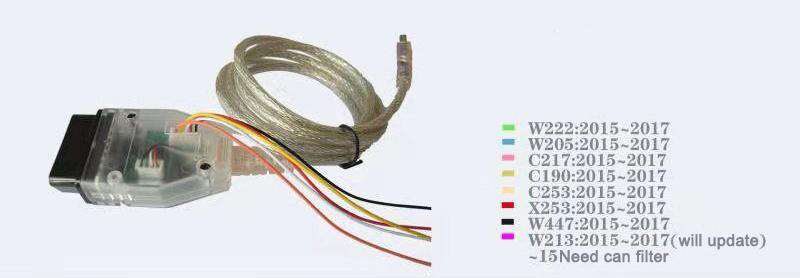
List of Supported Chassis:
W222: 2015~2017
W205: 2015~2017
C217: 2015~2017
C190: 2015~2017
C253: 2015~2017
X253: 2015~2017
W447: 2015~2017
W213: 2015~2017 (to be upgraded)
If you have no idea about the type, please check the picture below. You don’t need to do anything in this step if your chassis is one of the listed above.
But for Mercedes Before the Year 2015, please add this Can Filter 18 in 1.
Accepted Chassis of Benz Odometer Correction Tool

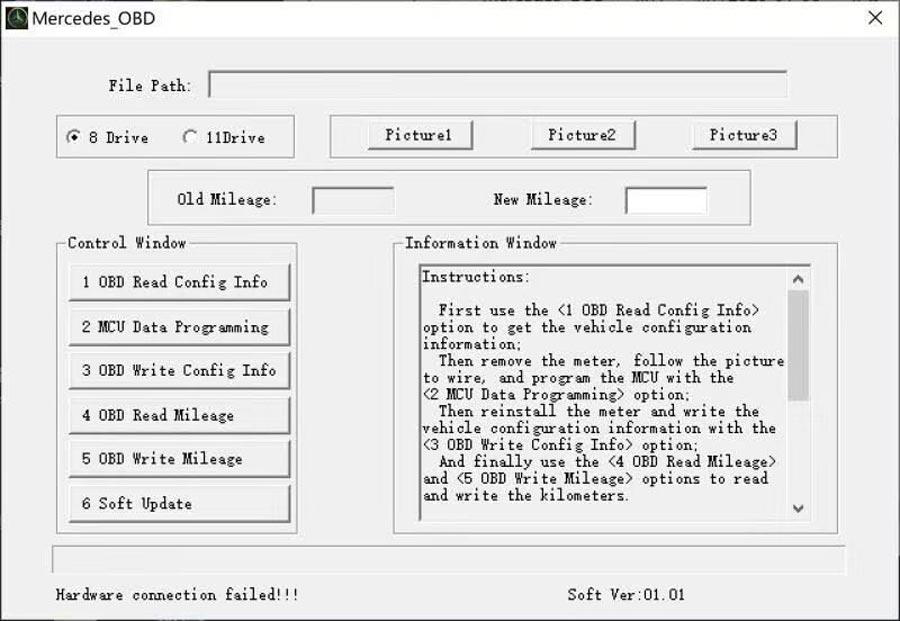
How to use Benz Instrument Calibration Tools?
Open Mercedes Odometer Correction Software;
(Tips:Please make sure that the vehicle battery is sufficiently charged. The process takes 30 to 60 minutes. Therefore , the vehicle must be fully charged!)
The information display interface contains instructions for the entire procedure.
Instructions:
1 use the <1 OBD Read Config Info>option to get the vehicle configuration information;
2 remove the meter, follow the picture to wire, and program the MCU with the <2 MCU Data Programming>option;
3 reinstall the meter and write the vehicle configuration information with the <3 OBD Write Config Info>option;
4 use the <4 OBD Read Mileage> and <5 OBD Write Mileage> options to read and write the kilometers.
5 Modifying the kilometers again is only required to operate in <4 OBD Read Mileage>or <5 OBD Write Mileage> steps!!!

Note:
<1 OBD Read Config Info> and <2 OBD Write Config Info> communication takes 15-30 minutes, Please make sure the vehicle battery is sufficient! Before operating <2 MCU Data Programming>, Please confirm whether the meter is 8-drive or 11-drive.
Odometer-Correction-Tool-User-Manual-for-Mercedes-Benz-Year-2015-2017-3
Step 1: OBD Read Configuration Information;
If Odometer Correction is supported, please make sure the vehicle battery is sufficient.
If Odometer Correction is not supported,
* For cars before 15 years, you need to add a filter. After that, you can operate steps 4(OBD read kilometers)and steps 5(OBD write kilometers);
* For cars after 17 years do not support Odometer Correction temporarily.
Take the calibration process of Benz W205 chassis instrument for 16 years as an example:
Main step:
* OBD reads configuration information
* The MCU edits the data
* Write configuration information
* You can adjust the mileage
Let us go through them one by one:
1.OBD reads configuration information
Please remember to save Configuration data after successful reading!
2.The MCU edits the data
At this time, you need to remove the back cover of the dashboard, select the type, and select the wiring method according to the type.
You can open the wiring diagram directly. There are 5 wires in total(as the picture). The Dashboard is divided into 8 drives and 11 drives.
Odometer-Correction-Tool-User-Manual-for-Mercedes-Benz-Year-2015-2017-4
The drive type of Benz Odometer Correction Tool
The MCU edits the data
After connecting the wires according to the wiring diagram, perform the operation.
If the MCU data is edited successfully, the wiring can be removed.
3. Write configuration information
* the configuration information is reading data.
* select the saved data at this time.
* you can get the prompt that the vehicle configuration information is written successfully
4. You can adjust the mileage
Read the kilometers first, and then write the kilometers
For example, we wrote the mileage of 12345.Afterwards, the popping-up result is 12345km.
Look at the dashboard again, the kilometers are correct! The steps are complete!
The features of Benz OBD2 Odometer Correction Tool
* If operating through the OBD2 interface, no wiring required.
* If the operation is perform ed by wiring, No filter required.
* Supporting 2015-2017 new Mercedes-Benz.
* No filter; Not change meter; Security;
List of Supported Chassis:
W222: 2015~2017
W205: 2015~2017
C217: 2015~2017
C190: 2015~2017
C253: 2015~2017
X253: 2015~2017
W447: 2015~2017
W213: 2015~2017 (to be upgraded)
If you have no idea about the type, please check the picture below. You don’t need to do anything in this step if your chassis is one of the listed above.
But for Mercedes Before the Year 2015, please add this Can Filter 18 in 1.
Accepted Chassis of Benz Odometer Correction Tool
How to use Benz Instrument Calibration Tools?
Open Mercedes Odometer Correction Software;
(Tips:Please make sure that the vehicle battery is sufficiently charged. The process takes 30 to 60 minutes. Therefore , the vehicle must be fully charged!)
The information display interface contains instructions for the entire procedure.
Instructions:
1 use the <1 OBD Read Config Info>option to get the vehicle configuration information;
2 remove the meter, follow the picture to wire, and program the MCU with the <2 MCU Data Programming>option;
3 reinstall the meter and write the vehicle configuration information with the <3 OBD Write Config Info>option;
4 use the <4 OBD Read Mileage> and <5 OBD Write Mileage> options to read and write the kilometers.
5 Modifying the kilometers again is only required to operate in <4 OBD Read Mileage>or <5 OBD Write Mileage> steps!!!
Note:
<1 OBD Read Config Info> and <2 OBD Write Config Info> communication takes 15-30 minutes, Please make sure the vehicle battery is sufficient! Before operating <2 MCU Data Programming>, Please confirm whether the meter is 8-drive or 11-drive.
Odometer-Correction-Tool-User-Manual-for-Mercedes-Benz-Year-2015-2017-3
Step 1: OBD Read Configuration Information;
If Odometer Correction is supported, please make sure the vehicle battery is sufficient.
If Odometer Correction is not supported,
* For cars before 15 years, you need to add a filter. After that, you can operate steps 4(OBD read kilometers)and steps 5(OBD write kilometers);
* For cars after 17 years do not support Odometer Correction temporarily.
Take the calibration process of Benz W205 chassis instrument for 16 years as an example:
Main step:
* OBD reads configuration information
* The MCU edits the data
* Write configuration information
* You can adjust the mileage
Let us go through them one by one:
1.OBD reads configuration information
Please remember to save Configuration data after successful reading!
2.The MCU edits the data
At this time, you need to remove the back cover of the dashboard, select the type, and select the wiring method according to the type.
You can open the wiring diagram directly. There are 5 wires in total(as the picture). The Dashboard is divided into 8 drives and 11 drives.
Odometer-Correction-Tool-User-Manual-for-Mercedes-Benz-Year-2015-2017-4
The drive type of Benz Odometer Correction Tool
The MCU edits the data
After connecting the wires according to the wiring diagram, perform the operation.
If the MCU data is edited successfully, the wiring can be removed.
3. Write configuration information
* the configuration information is reading data.
* select the saved data at this time.
* you can get the prompt that the vehicle configuration information is written successfully
4. You can adjust the mileage
Read the kilometers first, and then write the kilometers
For example, we wrote the mileage of 12345.Afterwards, the popping-up result is 12345km.
Look at the dashboard again, the kilometers are correct! The steps are complete!
评论
发表评论